

It's been 8 month since my stroke now, though, and the wonderfully brilliant NHS has helped me in my rehabilitation with regular home visits and physiotherapy which has helped combat my right-side weakness (Hemiparesis). Today I hardly notice this physical weakness and so thought it was about time that I got back into my modelling hobby (though I expected to be a bit rusty).
Starting Again From Square One..?
Actually, it's a bit inaccurate to say I'm having to start again from scratch because I still - of course - have all my experience and knowledge of model making and painting techniques. I'm just out of practice, plus am unsure about whether I still have some difficulties with manual dexterity.Because of this I decided to start with some very basic and unambitious modelling projects, projects that would entail the use of more elementary hobby techniques just so I could get back into the swing of things.
I had some half completed models on my shelf from before September which made for easy exercises in getting back into the saddle. One in particular was no more than a simple sanding and spraying job - a bust of the Roman emperor Julius Caesar. This was a pretty straight forward min-bust done in a plain plaster effect paint, no brushes required. First, project done 'tick'. 😃
 |
| Above: An easy start. Simple faux bust. |
This was a good confidence builder, so I decided to move up one level of complexity (but not by much).
First New Projects...
So, what next? Well, because I'm so nervous about this return to modelling I'm erring on the side of caution and keeping the complexity of builds and painting LOW!My first two new 3D prints were picked for their simplicity, both in their construction (low numbers of parts) and the pretty straight forward painting, with minimal special effects like weathering, etc. I had a good hunt round Thingyverse and found a couple of easy looking candidates...
1. FAIRBURN-SYKES COMMANDO DAGGER
Well, you can't get much more simple that this model! 😂
However, because of the relatively small print bed on my Flashforge Adventurer 3 I will still have to print out this model in three pieces and then glue them together!
 |
| Above: The separate printed parts of the dagger during the process of joining them together using plastic rods for strength. |
This model will make a really nice desk ornament (or even letter opener) and the STL 3D file comes a s a one-piece or two-piece design BUT it's a very long object so I had to break it down further in FlashPrint even further into a three-piece print!
The authenticity of the model is a bit questionable as it seems to be a very early version with a brass handle, but I like the look of it. At a later date I will try modifying this model in TinkerCAD to resemble the actual WW2 issue Commando version (with the ribbed handle).
 |
| Above: After gluing and LOTS of sanding the parts of the model went together quite nicely. Once painted you hopefully won't see the join! |
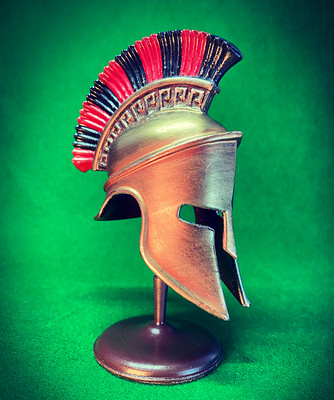
2. 1/6th SCALE SPARTAN HELMET
Moving up a notch in complexity - but still quite simple - I found a lovely model of a ancient Spartan helmet that I thought would look great on my display shelf. I really have a soft spot for the ancient classical world and this model will go nicely next to my Roman emperor busts.
 |
| Above: The helmet model already comes 'sliced' into separate files so it fit's easily onto my printer. Even so I wanted to print out a smaller scale 'test' version first to try out my painting skills. |
 |
| Above: One half of the helmet crest printed out on my Flashforge Adventurer 3 print bed. I was pleased with the quality. |
As this model would entail a bit more painting work of slightly more advance techniques I decided I would be really, really cautious and print a smaller scale test version so I could practice my painting before moving on to a larger sized final version. I wouldn't have normally taken this precaution in the past but being so unsure about how steady my hands are now made me think this was a wise thing to do.
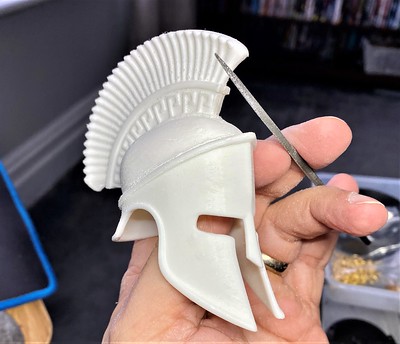
As it turned out, I was so pleased with the quality of the print that I got that I went straight ahead and did the larger scale version straight after it's smaller brother came out the printer! I'm still amazed at my Flashforge printer and what it can produce, even though technology has moved on leaps and bounds and newer resin printers are capable of much higher resolution.
 |
| Above: My test model compared to the final version! |
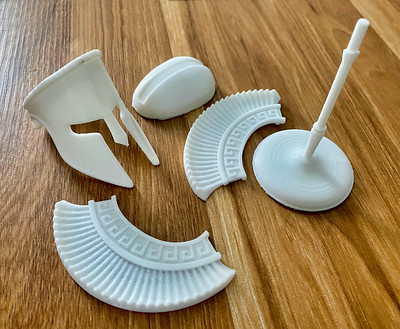 |
| Above: All the component parts of the helmet plus a display stand. |
The first challenge was putting the model together without - hopefully - any noticeable joins between the parts. As I said, it's been a while so trying to remember my 'process' was a bit difficult. I couldn't even remember which glue I found worked best with PLA printed parts! (I resorted to the good old stand-by of super glue.)
I have to admit that I was a bit slap dash in tutting together the smaller test model and I didn't take the usual care in filling and sanding and cleaning up things that I would usually do for a display model. Still it was great to get back into model making again and I soon started to get back into the old routine...
 | ||
| Above: One unforeseen issue was where exactly I had left all my modelling tools! I had to do a bit of hunting around to find all of my files and sandpapers and bits and pieces!
|

You apply the paste by brush or cotton bud and once it is dry you can polish it with a cloth and it actually buffs up like real metal!!!
 |
| Above: Having applied the AK True Metal medium you can use a cloth to give it a gentle polish and you can get a realistic shine! |
I took a few questionable gambles with how I approached the effect that I was trying to achieve. It was all a bit sloppy, but I thought I might modify and apply what I found successful to the full sized version so I wasn't too bothered when some things didn't work.
In the end, I got what I wanted to know our of my work on the small version and didn't go into any fine detailing that I will do wit the full sized model (for example, I did not give the crest anything more that some base colouring).
 |
| Above: My finished test piece. I got enough information out of this experiment to have a firmer plan about how to paint the large version. |
Conclusions...How Rusty Am I?
First of all, it was nice to get going again with my modelling hobby. A lot of my trepidations were down to a bit of a hit that my confidence had taken. A stroke - even a 'mild one - can really put you on a bit of a downer, and you often (especially at the beginning) think the worse. Only over time and with support can you regain your confidence in yourself even if you are left with some issues, realising that it's not 'all over' is an important step towards continuing life.I was scared that I might not be able to do my hobbies any more, but thanks to the support of the NHS Stroke Team and my joining a stroke support group I realised that I was VERY lucky and had little to moan about compared to others.
In the end, I have regained a lot of the strength on my rights side and the dexterity of my right hand. My problems are mainly due to mobility and mostly allow me to do a lo of the stuff I could so before when sat down at a desk.
These simple exercises in model making have proven to me that even if I were not to have regained my full abilities I can still fully enjoy a hobby that I get so much pleasure from! Always be positive.
Next: Conclude the final painting stages of the above model projects and then move on to something a little more ambitious.
Post a Comment