

Can I perfect a method to make my own 'kits'?
Russian Doll Building Technique
This is a minor project off-shoot of my N Gauge Gas Station. I decided that I wanted to have a storage shed in the back yard area of the station. This was a ideal opportunity for me to try out an idea for making 3D printed buildings that I've been toying with for a while.
The basic idea is for me to construct a sort of Russian Doll construction made up of inter and an outer materials. The inside core being the transparent PLA print and the outer being a cladding made up of textured plasticard. I would cut the window holes in this card so that the transparent PLA shows through......
It may seem a over complicated way to construct buildings and a waste of the transparent PLA, but actually the transparent PLA is just the same cost as the normal coloured version. The point of this being that the inner 'core' print act as a guide and a support for the outer 'sleeve' material.
 |
| Above: Very rough concept of what I'm trying to achieve. The goal is to produce an 'easy bake' prefabricated building 'kit'... Kind of! |
This gives me a useful framework for me to hang the outer decorative elements... Well, that's the theory at least!
In Practise...
Well, let see if this actually works. I start by cutting out all the parts, effectively making a 'kit' for my shed...
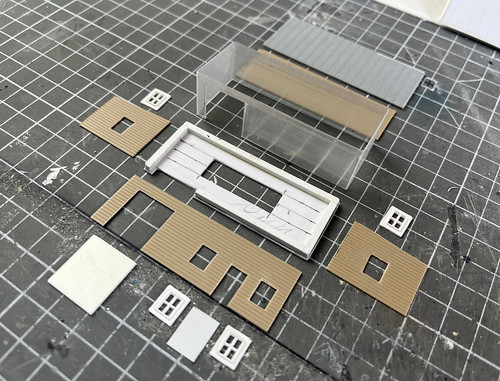
My only worry is how stable the inner transparent core will be as it looked pretty flimsy when it came off the printer. The hope is that the core is just one part of the overall strength of the construction, the rest of the strength coming from when all the parts are glued together.
A good start, I glued in the windows and prepared the outer cladding for priming. I dry tested the fit (sticking parts together using tiny dots of BluTack) to make sure all the parts mated correctly and the result wasn't all that bad...
Now, The Tricky Part...
A bit of a puzzle is when to start painting? Looking at how things are going together and that there are windows I don't want to paint over I had to plan the painting process carefully.
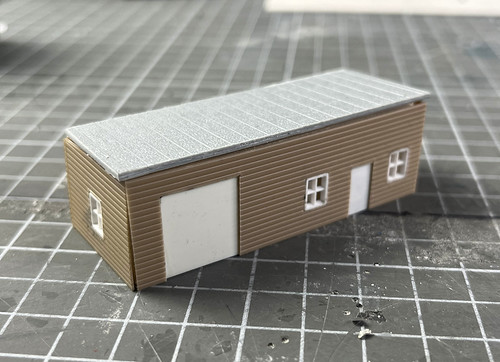
I wanted to prime the cladding parts before I undertook the final construction. If I did this I would avoid any issues with the windows. But this would mean a certain amount of touching up once the model was put together...

The main issue would be that I would want to add some corner strips to the - now - cladded body of the building to hide any gaps that there might be between the adjoining walls. What I decided to do was mask the now primed window areas and give the now added corner strips a quick squirt with primer.
I'm sure there are other ways to do all this but this is the easiest way I could think of doing this. I've said it before but I do love the nice clean look of a primed model!
On To The Hand Painting
I want my layout buildings to be rather shabby and weathered. I don't like the virgin pristine look of some model railway layouts that I've seen, where there's no litter and no dirt or graffiti. These layouts are too sterile for me.
SO, whites will be off white and there will be grime! 😄
The first job, though, is outlining (or panel lining). Highlighting lines and seam detail on the model by applying a thin inky paint into that very thin detail so that that detail then pops out and is more easily seen...
 |
| Above: Using an AK Interactive wash to panel line between the slats. I'll then clean up the board themselves by painting them as weathered boards. |
Different people tackle their painting in different ways and in a different order, but I like to outline first as it marks out the different parts of the model's detail so that you have a better idea about what you might want to do with that detail.
I have in mind a bit of a shabby weather worn timber shed. So I'll work into the slats with various shades of grey accented by patches of off-white to represent peeling paint... Hopefully! 😉
The roof will be a green-grey and the doors faded green paint, again peeling and patchy. Let's see if I can get the walls looking aged...

Conclusion...
Well, it wasn't a hard build, most of the work was in the painting (not good news for me). But the main goal of this model was to test out the transparent filament and the idea of 3D printing the core structure for N Gauge building projects.
The outcome was a bit of flop as far as the idea of making a transparent core for the building, it was hardly worth it for this shed as it only had four small windows! 😆 Were the building a store or an an apartment block with a LOT of BIG windows it might have been worth it.
On the other hand, having the 3D printed core onto which I could glue my texture plastic material to did work out. It was very helpful having a sort of skeleton structure to work on. BUT, in future I may just print the core with plain PLA filament and go back to glazing the windows with thin transparent plastic.
So, 50/50 success and failure...But it was an experiment.
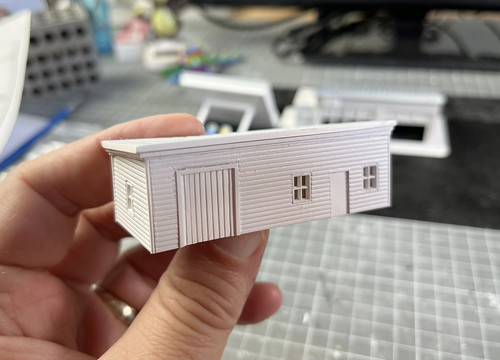
As to how the model looks, I'm quite pleased, even though my painting skill are somewhat less than they used to be. It's OK and should look good when set in position on my gas station diorama.
I will try this 'Russian doll' approach to model construction again, I have a warehouse model in mind that will be an interesting subject.
Post a Comment