

Which B17 Gunnery Stations Do I Like Best?
Fun Play Versus Successful Mission?
Some of the gunnery turrets are more fun to play than others but - of course - this is a matter of personal preference. Some may like the dizzying 180 degree dance that is the turret gunner while other might like the concentrated fixed field of view the waist gunners or even the claustrophobic box that is the tail gunner.
Each position has it's pros and cons - from a game play point of view - and you also have the additional choice of specialising on one position or the frenetic juggling which is compartment swapping! Again, some might prefer one type of play over another.
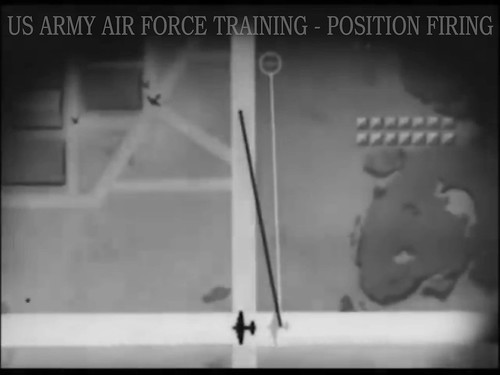
Above: a REAL USAAC aerial gunner training film!
Personally I like to specialise - choose one position - as I would argue that it's a more authentic sim way of doing things - the real gunners didn't jump from one position to another in WW2 - and it allows you to get proficient at using that pun position to it's full advantage, thus increasing the chances of a successful mission.
So here's a little look at some action footage I took whilst trying out all the gunnery positions, it might help you choice what style of gunnery play you fancy...
1. NOSE GUNNER
I'm glad to get this particular gunnery station out the way first, because - in my opinion - it's perhaps the least useful and least interesting position to play. The nose gun is a single M2 on a pinacol mount cramped into an awkward asymmetric location pointing forward on the starboard side of the bombardier/navigator compartment.
The arc of fire and field of view from this point is the most restricted of all the other gunnery positions on the B17. But what's worse is that it does not have a dedicated gunner, it was an 'emergency' fix to the German tactic of head on attacks and - as with the chin turret - was manned by whomever was available between the bombardier and navigator (I found using that navigator for this nose gun the most logical).
Being a 'one trick pony', other than head on attacks the gun was useless for anything else. I found - as it was restricted to a roughly 90 degree arc biased to the forward firing position, time after time I caught sight of a target just in the corner of my line of sight - to the right - but was unable to do anything about it!
 |
| Above: Get used to this happening when you play Nose Gunner! I can see him but my gun cannot traverse any further back. Frustrating. |
This and the chin turret are the two positions that you cannot really specialise in as I would do with any of the other guns as - for a large portion of the journey to and from the target - these positions were unoccupied. The bombardier and navigator being busy doing their own jobs.
Through my several play throughs in this position I only managed one single 'probable' damaged hit.
Link: NOSE GUNS IN THE B-17 by Pat DiGeorge
2. CHIN GUNNER
While being a non-dedicated position like the nose gun, the chin turret is actually quite useful and from a play point of view quite fun to use. It has good specialist sights and a approx. 180 degree field of fire with it's twin .50 cal guns.
The only fly in the ointment is that - like the nose gun - it is a sort of 'emergency gun' intended to deal with the head on attack (so, in total, the could be three M2s firing forward, in theory). In this case the manning of this position was usually done by the bombardier.

Now, while - unlike the navigator - the bombardier was perhaps not so busy on the flight to and from the target he was very busy - of course - once approaching the target so unable to fulfil the secondary role as chin gunner.
This may have not been such a big issue as I imagine head on attacks by German fighters were perhaps mostly encountered on the inward or outward journey and not so much during the bomb run?
But in any case, it's another of the positions where you wouldn't really position yourself as a specialised gunner throughout the mission. Like the nose gun, it's a position that lends itself to the role swapping technique of the game (if you are adept at that). Again, not a favourite occupation of mine.
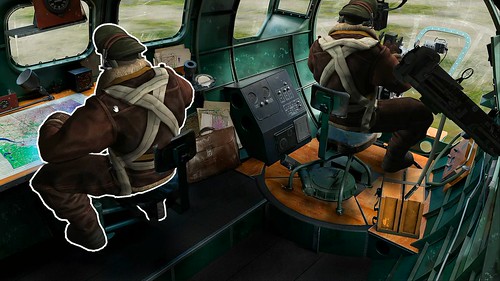
3. UPPER TURRET GUNNER
My personal second favourite gunnery position to play. You can cover a lot of sky in the top turret, both - importantly - to the high-rear (the crucial 6 o'clock) and also contribute to head-on defence. And, of course, everything laterally in-between.
Along with the ball gunner, you are most able to track targets for a longer period - relatively speaking - in a way that the much more restricted fields covered by others do not allow them.

I was surprised - though - that when I started playing this station for the first time just how much of your vision was hampered by the turret's frame and big gun sight. But this may be due to the fact that there's no 'free look' facility in the game which allows you to turn your 'head' independently from which way the turret is facing, thus increasing your field of view.
It's the ability - as I mentioned - to track targets through a wider range of motion is this position's biggest advantage. Obviously you lose sight of targets which are diving past diagonally or vertically very quickly, but on the horizonal you can sweep your guns around a 360 arc.
4. LOWER BALL TURRET GUNNER
The dreaded ball turret, at least that's the bad reputation this position has. The general opinion is that this station is both cramped, claustrophobic and - they say - dangerous. At least that's the impression that movies like 'Memphis Bell' leaves you with.
However, statistic seem to contradict the general view on this turrets safety as they showed the Ball Turret gunner was the least likely member of the crew to be wounded, as he was surrounded by armour plate, however, he was also the least likely to survive should the plane be shot down.
...In the case of landing gear system failure, the ball turret would likely be destroyed due to the lack of clearance, meaning anyone occupying the turret would be in a precarious position!
Other statistic paint a darker picture about the Sperry Ball Turret: While B-17 crews had a 30% mortality rate, the ball turret gunners had a 60% mortality rate
So, while in reality it was NOT a good place to be in a game, however, the turret is a reasonably good position and very useful. The view is, as with the top turret, kinda cluttered with most of your vision impeded by the turret frame and the sights. But this is somewhat compensated by the fast 180 degree range of movement.
5. WAIST GUNNERS
Looking at the big 'window' on either side of the B17's mid fuselage I always thought that the waist gunners had a nice wide view from which to acquire their targets...
What I found, however, was that unless the enemy fighter was coming at them directly side-on they suffer from one major draw-back. A side attack is less likely - not unlikely , just less likely - than the most obvious and common attack, which is - of course- from the rear or '6 o'clock'.
This means that the vast amount of targets I saw passing my waist gunning 'window' were fighters flashing past me quite closely from rear to front. This was because they had dived in from to attack from the rear - giving them the best chance at spraying up along the fuselage of the B17 and - crucially - getting shots in one the venerable engines!
...They then brake off - left and right - shooting past past the B17 pass the waist gunners positions but by then so fast that there is only the most fleeting of a target and not much of a chance to get much of a shot.
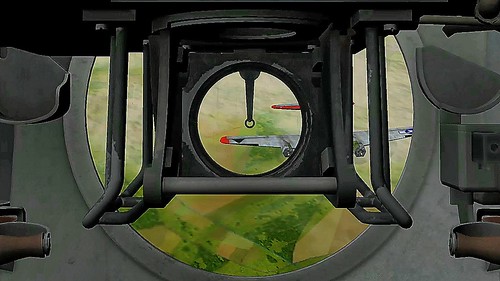
6. TAIL END CHARLIE
Possibly the most crucial defensive turret given that the majority of attacks. German pilots are quoted as going after the tail gunners position on purpose. While both the upper turret and the ball turret can contribute to the '6 o'clock' defence (upper or lower) the tail gunner has the most unobscured view of all the rear field of view.
Importantly, and conversely, a direct attack on the 6 o'clock is also perhaps the most dangerous for the incoming fighter pilot too!
The most difficult aspect of arial gunnery is working out the 'lead' on tangential targets in relation to the direction that your aircraft is travelling itself. Without going into complicated trigonometry, the knack of bomber gunnery was to fire at where the target would be rather at where it is when you pull the trigger! (Yes, that is dumbed down a lot - but I asked my science teacher wife to explain this to me and I lost the will to live 5 minutes in to the explanation)!!!
Cutting to the chase - literally in the gunners case (brum-tish) - it's trickier to calculate the potential position of an incoming target when he is coming at you from a tangent as both he and you are moving at different speeds and at slight different directions...UNLESS... he comes directly at you from the front or rear, in which case 'leading the target' becomes somewhat less of an issue...
 |
| Above: Slide from the original USAAC gunnery training film on 'position firing' and how to 'lead' the target. |
In fact, most of the time the 12 o'clock and 6 o'clock target is almost flying into your stream of fire without you actually having to do much more than pointing your gun vaguely in the approximate direction of attackers!
All of this is completely unscientific, but it seems to be true of B17: The Mighty 8th! To be frank, as the tail gunner I shot down the majority of my incoming fighter kills completely accidently! 😆
OK, all that was very tongue in cheek, there is - in reality - quite a bit of prediction as to where a fighter - once spotted - will com into your field of view and arc of fire. So, top tip, play close attention to those clock face call outs!
While - for example - a 'incoming at two o'clock' call might not seem to immediately concern you as the tail gunner, that plane will in all probability be coming past your position as his flight path takes him on his merry way! Be prepared for this.
(In a way, this is a reason why position jumping in this game can actually be counter-productive, as by the time you have swapped from one position to another in pursuit of a passing target, he has already out-paced you and moved past whatever gun position that you've jumped to! Just saying.) 😏
CONCLUSION
Personally, I would suggest that in the beginning learning by specialisation allows you to master all the positions individually before stepping up the compartment swapping aspect of the game. Jumping quickly from one gun to another that you aren't altogether familiar with is just a recipe for missing targets and conversely lowering the overall proficiency of your crew.
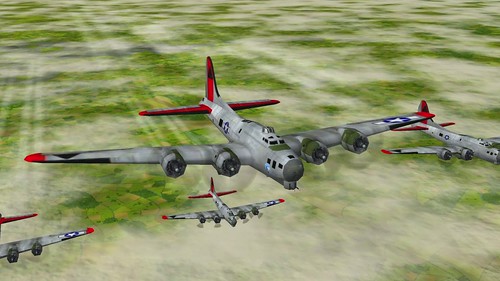
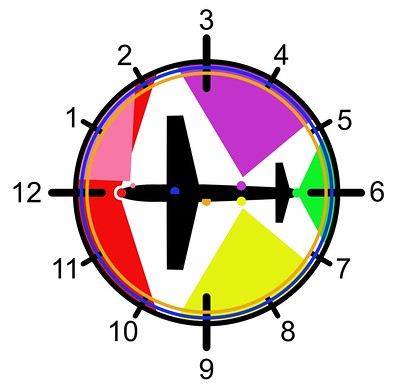 |
| Above: B17 Arcs of Fire. Upper turret (blue) gives you 360o upper field of fire and the ball turret (orange) 360o lower. |
Think of it as being like one of those plate jugglers... You have to maintain maximum aptitude for each position otherwise it all comes crashing down... Here's a video that illustrates 'position jumping' in B17: The Mighty 8th! 😆
 |
| Above: An early attempt at 'hot swapping' positions, which turns into a chaotic mess resulting in the loss of BOTH my waist gunners at the same time! |
Notes on my position swapping experience: First instalment of my Top 10 rend down of my favourite war movies. Not, I hasten to add, what I believe to be the greatest war movies, but rather the 10 war movies I like most!
The consequences of trying to be a jack of all trades...You end up being a master of none! Now, while I am sure you do get more adept at 'position swapping' the more you play this game - and big hint here, LABEL your hotkeys for the different turrets - in the beginning trying to keep up with the chaos of a swarm attack just ends up a big hot mess! ...As you can see here where I lose BOTH my waist gunners at the same time!
Now, at this point in the games release - it is still early access - the interface is a buggy dumpster fire! Sometimes you press a hotkey to switch positions and....Nothing happens! And then, after a long pause, you change places BUT by that time the target has moved on. FRUSTRATING!
In the end you get so annoyed that you start button bashing just to find a gun position that you can use. This is a recipe for disaster as you loose all of where you are in relation to the attacking planes.
This state of the game is another good reason why picking a station and sticking to it is - at this point - the most efficient way to play the game. Hopefully, they will sort out these bugs soon.
My favourite play style is - as I mentioned - sticking to one position, as that just more 'realistic'. Sure it cuts down on the frenetic action a bit and sometimes you only see a percentage of targets. But I think you are 'simming' properly this way. Others may disagree.
Anyway, which gunnery position do I like the best...?
Well, I think I'll rank them as what I found to be the easiest to use and most useful
- Nose Gunner - least useful. Only good for frontal attack and IF it is crewed. No hot key.
- Ball Gunner - hardest to use for the beginner. More useful with experience.
- Waist Gunners - Nice field of view within a restricted frame, prey for a lucky pass.
- Chin Gunner - great view but best for frontal attacks.
- Top Turret - 360o coverage of the top BUT not great depression, but fun.
- Tail Gunner - Best chance for kills. Most important position. Most fun. Small window!
Right, having bored you silly with my meandering ramble I think you deserve a bit of a reward for bearing with me, so here's a far more entertaining look at the B17 from Lord HardThrasher... You will smile...
Thanks for stopping by! TTFN 😀
Post a Comment