Recreating A 1940's Detectives Desk Top
What Is A Gun Prop?
Thought I'd start out with a bit of an explanation as to what I am up to with this project, as the replication of imitation guns is a bit of a contentious subject.
I am interested in what I will call '1:1 scale dioramas', creating a full sized version of a historical or fictitious assembly of items to create a photographic vignette. In this case, what I want to do is recreate a 1940s era Noir detectives desk top, something like you would see on a book jacket setting the scene for a story.
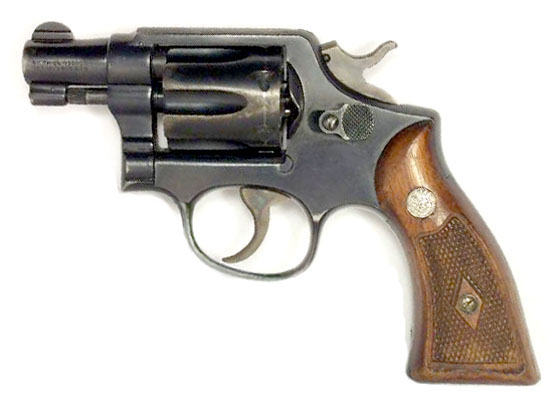
As part of this I will be 3D printing a model of a .38 Special 'detectives' snub nosed revolver as the centrepiece of the display. This, however, is a little tricky here in the UK as creating or owning a realistic imitation firearm (or RIF) is controlled legally. To do so you are obligated to provide a 'reasonable defence' as to why you would own such a replica (even if it is non-functional, deactivated, non-lethal or blank firing).
Reasonable defences could be that you are a member of an airsoft club, a member of a theatrical group, a registered or recognised historical collector or a member of a re-enactment group. Basically, you have to be able to convince the local chief constable in your area that you have a good reason to own a replica.
While I am not a member of a theatrical group I am pretty sure that if push came to shove I could provide a 'reasonable defence' as to why I own a replica - that is for the purposes of photographic recreations of dramatic scenes. Of course, it is not likely to come to this - and a further point of my defence would be - because the replica would never leave my house.
That all said, it's as well that were you to follow my example that you should be aware of the legalities and also that you should NOT use my example defence as the reference point for your own... I AM NOT A LAWER!!!
That said, let's get on with the project...
Part One - Making A Replica Vintage Cartridge Box
As part of my vignette I want to show the detective's revolver next to a box of bullets, as if the owner had just been loading his gun prior to undertaking some dangerous investigation.
Imagine Sam Spade's or Philip Marlow sat at his desk giving one of his monologues about a case before setting off to confront a suspect or conduct an investigation. Before him, on the desk, are the items you might expect to see, like his revolver, cartridges, a glass of bourbon, a smoking cigarette, some notes and photographs, etc...
This is the scene I want to build for my photo, and I am starting with a making a box of .38 Special bullets!
Finding Period Reference Material
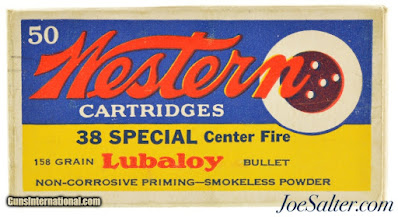
Luckily for me, collecting historical bullet packaging is a fairly popular pastime for those interested in firearms history and so there is plenty of photographic reference material available online, particularly on auction websites. This is where I came across a very attractive and colourful WESTERN CARTRIDGE COMPANY .38 Special box.
 |
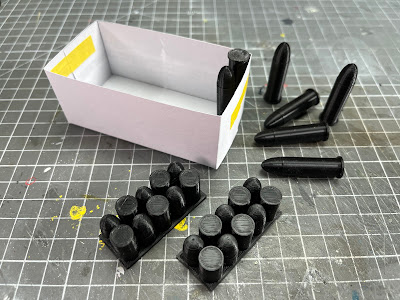
| Above: Having printed off some dummy .38s I was able to work out the depth of the inside box... |
The deactivated cartridges I bough were a flat nosed variety but the photo of the bullets in the photo of the Western box showed a round nosed variant of the round. Bummer! This meant - to keep everything 'authentic' looking - I would have to 3D print a complete set of round nosed dummy rounds to match the box I had.
 |
| Above: Originally I bought some deactivated (legal) .38s but they turned out to be the wrong type for the Western brand cartridges, So, I 3D printed some of the correct round nosed shells. |
So back to TINKERCAD it was to design some .38 Special round, though - luckily - a bullet is a pretty simple shape to create!
This change of bullet design had a knock on effect as it changed the dimensions required for the depth of the cartridge box (the round nosed bullets being slightly taller than the flat nosed variety). Back to the drawing board then! 😄
The final design completed in Affinity Designer vector design software I tried out a few test prints on paper to check that the measurements were sound, folding up the paper box design into it's final shape...
 |
| Above: Having worked out the interior tray size I was then able to draw up the exterior sleeve of the box. |
 |
| Above: The blank prototype tested for size, I pasted up the final carton replica from images I found on the internet. |
Everything looked fine so I then printed out the final colour version onto a thicker card stock (the inside box part which held the bullets I made using a old Amazon package to get that brown cardboard look)...
I decided that there was not point to 3D printing out 50 dummy bullets for the contents of the box (which were how many the original Western packet held) as - for display - I only intended the interior cardboard holder to be just peeking out the box slightly, showing just a handful of the tops of the bullet contents.
Because of this I made a small fake tray of bullet tops and bottoms - a dozen or so - which would sit on a raised piece of foam board to give the appearance of the cartridge box being full. This would save me printing so many dummy bullets, which would be a lot quicker to print....
With my dummy trays 3D printed I was able to double check the box dimensions and fit and satisfied, glue the box together...
If I say so myself I think the finished cartridge packet looked pretty good!
All that was left is to paint the dummy bullets and that would be this first part of the project completed.
'Brass' is a tricky metallic colour to get absolutely right - IMHO - you don't want to go too gold, on the other hand too much red tone can go in the copper direction. I do have a couple of Vallejo paints that describe themselves as 'brass', but the best of the two does lean towards the gold side of the equation. Still, it was a starting point and I figured I could dull it down a bit with some washes later...
The bullets themselves are round nosed and lead coloured, so I'm starting with a slate grey colour, and - again - I may try to do some modulation using a dark wash.
 |
| Above: Base painted colours compare to a real (deactivated) .38 Special bullet. The tarnished brass is a lot duller. |
| Above: Adding a metallic sheen to the lead bullets using carbon powder (sanded pencil lead). Above: Tarnishing the brass cases using Citadel shading wash. |
That these dummy cartridges will be mostly hidden inside the box will help out and hopefully make up for my mediocre painting skills! LOL
 |
| Above: The lead powder applied to give everything a metallic sheen I used some shading wash to give depth to the primer caps. |
The tarnishing took a bit of time to get right, a layer of stain and dirt but not too dirty. This also took the gold shine off the overly bright 'brass' paint. Decided to call this a day before I went overboard. And so, here's the final result...
I've never done replica props before so was very pleased with the result. Funnily enough, I most enjoyed the replication and creation of the vintage box and look forward to doing more printed replicas for my photo scene. I think I might have a go at a replica 1940s cigarette packet next?
---------------------------------------------
NEXT: In part 2 of this project I will actually start work on the .38 Special revolver itself.


Post a Comment