

My First Steps in Planning a Model Railway Layout!
You Would Think Playing Trains Was Easy!
Having concentrated so far on building a modest collection of track and rolling stock it's time to get to the nitty gritty and start planning interesting layout designs.
But, before that, I kinda have to decide what kind of model railway hobbyist I am. I've taken it for granted that I'm just in this for fun and in a way it was the modelling of the scenery that would be my priority as I have a great love for traditional Japanese architecture.
The picture I had in mind has always been based on the scenes from Hayao Miyazaki's animated movie 'Spirited Away'. A very nostalgic take on rural Japanese train transport.

I just wanted a simple layout which really was a setting for my modelling of an idealised Japanese country community of buildings, and I had no real interest in 'modelling' or recreating a realistic and authentic simulation of Japanese railways.
No recreation of complex running schedules or modelling of an actual piece of Japanese railway for me! But, that said, there is still a bit of planning that has to go into the setting of my scene and how I construct my modest layout.
Experimentation Using a Temporary Layout
Like most beginners I do not yet have a permanent piece of space with which I can lay down my model railway layout. And even if I did, I have no experience of making layouts so it's highly unlikely that my first attempt at a track design would be satisfactory for very long.
So, having no set space and no idea what to build with my track, a temporary layout will be my miniature railway laboratory for some time to come!
This initially took the form of my taking over the wife's dinning room table when she wasn't using it, but as you can imagine that was not a satisfactory situation. Quite aside from the fact that I had to wait until she wasn't using it I also had to drag all my track up and down stairs (from my attic man-cave) to set up a practise layout only to then have to disassemble it again so that it could be used as a dinning table again!
Not fun! What I really needed was somewhere I could set up my track and then be able to leave it set up - albeit temporarily - for a longer period of time while I tinkered with layout designs and track combinations.
What I needed, then, was - ironically - a 'permanent' temporary piece of model railway space! 😏😆
This problem I solved when I came across a sturdy trestle table on Amazon...
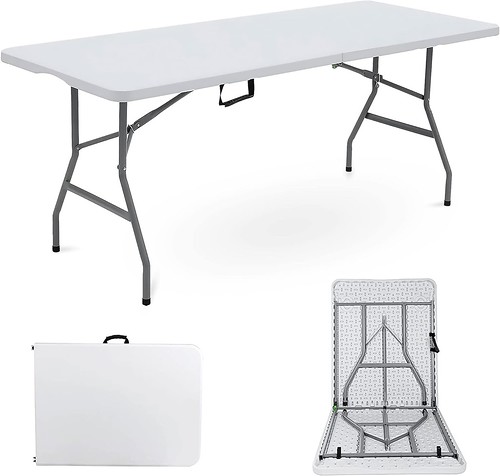 |
| Above: Denny International Trestle Table Indoor Outdoor Garden Catering Heavy Duty Folding Table for Picnic Party Dinner (5ft) |
I could pop up this folding table, which has enough surface space for a 50x28 inch (5ft x 2ft) layout, on which I could play about with my track until I got a better understanding about 'good' design practises.
Fabulous Track Designs (And Where To Find Them)
Right, so now I have some space. Not a huge space, but then I am working in the diminutive N Gauge scale. It's amazing what you can squeeze onto just a shelf in N Gauge!
To find ideas for interesting track designs - mainly based on the basic 'loop' format - I had two initial sources; KATO USA's web site and the PECO Setrack for N Gauge book.
Both of these resources have a selection of layout ideas based on a variety of 'baseboard' sizes, so I started by seeing what had been done in roughly my size of available space. I should reiterate at this stage that I am interested in a simple 'loop' format of layout. Real Model Railway 'nerds' often create layouts based on real sections of railway lines, which are largely linear in design, therefore they can often squeeze a lot more (or less) track onto a given space in a recreation of an authentic piece of line.
I likie the round and round toy line format as I'm just a big kid! 😉😆
Here's some examples...

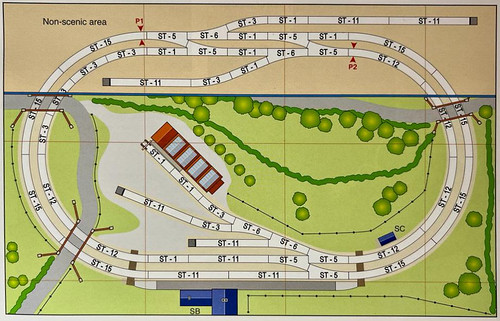
The above layout plan is from the KATO USA website and is on a base of 4’ 6” X 2’6”, so it's actually a little larger than my temporary table can accommodate. But, with a little modification I could build something quite similar.
The main sticking point is the additional 'third (semi) loop' at the outer right of the design. I'd love to have this extra option but would have to do some tests to see if I could squeeze this extra line in. Otherwise I live the inner spurs which would have plenty of interesting options for shunting.
The next layout design is from the PECO Setrack book and the baseboard size is 3ft 6 ins x 2ft 3ins (106cm x 68.5cm). Now this should fit easily onto my trestle table with room to spare IF the equivalent KATO Unitrack track sections are comparable in size - particularly the curve sections - with the PECO track. We shall see...
Again, this design allows for plenty of shunting action, with an interesting dual 'mainline' circuit plus a extra off loop spur 'parking spot'!
Making Up My Own Design?
I don't want to out and out copy either of the above designs, these are just ideas to inspire my own creations. What I will use to develop my own layout is a application called ANYRAIL 6...
 |
| Above: First Track Plan Attempt - Harder Than I Thought! |
Putting together a track layout design is really like a complicated jigsaw puzzle. Getting all the pieces to fit perfectly is a trail and error job!
As you can see I'm not anywhere near finished and am spending a lot of time swapping in and out track of different lengths and degrees of curves to get the darn thing to work. Still, it will keep me busy!
Post a Comment