A busy week with lots of small fiddly jobs!
xxHRxxxxx
It's been a bit of a slow couple of weeks for me, a lot of dog sitting and other real life stuff has gotten in the way of fun things! But, I'm slowly getting back into workbench projects again, so here's an update...
N Gauge Shunter Body Version 2
I've been making good progress on my second attempt to make a loco body design that will fit onto the KATO 11-109 power chassis. My first attempt had so much that I wasn't happy with, not least the fact that I - regrettably - had to relent and 'borrow' the general design layout of a centre-cab arrangement from a commercially available kit. Not a happy boy.
My latest design was more to my original concept as I managed - thanks to my first attempt - to work out how I could make a rear cab version of a shunter, despite the shape of the KATO chassis.
Anyway, again my design is fundamentally a 3D printed shell to which I added some scratch built styrene plastic detail. Although, this time, I took this idea one step further by printing the complete shell as a inner skeleton onto which I would build a detailed sleeve or 'cladding'. Furthermore, I printed the skeleton in a transparent filament to allow me to include the loco's windows as an integral feature.
 |
| Above: Adding bits and pieces of detail to the exterior and some putty to smooth out joints. |
It's something of a prototype concept, and I'm not sure if it's altogether a completely successful idea as it very much depends how others might think that the semi-transparent nature of the 'glass' is acceptable? But, in any case, I am happy with the slightly 'frosted' look of the windows (it hides the lack of any real interior detail).
Thus far I am at the stage in the project where I am adding the extra exterior detailing to the 'cladding'.
While I am rather pleased with the way this are going the one issue I have is the scale of the detail items as - unfortunately - due to my modelling limitations I am unable to work with bits and pieces any smaller than what you see here. Everything is a bit overly 'chunky', especially compare to detail on commercially made N Gauge loco models.
 |
| Above: It's getting there, a step closer to actually painting the model. |
So, despite my being somewhat happy with the way this model is going I am already thinking that a 'mark 3' version might be on the horizon in the future BUT to rectify the issues of scale detail I may have to wait until I have access to a high resolution resign 3D printer to get the results that I am after.
Doll House Japanese Takoyaki Restaurant Model
Next on the bench at the moment is a kit building project, but one of a type I have never done before...
I have, over a few years, been intrigued, by a what are called 'book nook' models, miniature recreations of building's interiors and exteriors in the form of small scale dioramas or 'vignettes'.
Essentially, this type of modelling is akin to 'doll house' making as they are done to a comparable scale to what we would think of when we picture a children's miniature 'play house'. Traditionally, a dolls house is usually thought of as being 1/12 scale in size.
 |
| Above: Just one of the small items I am currently making to populate my takoyaki store, a little microwave! 😆 |
Anyway, I wanted to have a go at a book nook but didn't really know where to start. But, that issue was solved when my eldest daughter - Kayleigh - bought me a lovely little kit for Christmas that covered two of my interests in one go - that of making a book nook and my like of Japanese traditional food stores and street food (I watch a lot of YouTube videos on the subject)!
The model she got me is of a tiny takoyaki restaurant...
'Takoyaki (たこ焼き or 蛸焼) is a ball-shaped Japanese snack made of a wheat flour-based batter and cooked in a special molded pan. It is typically filled with minced or diced octopus (tako), tempura scraps (tenkasu), pickled ginger (beni shoga), and green onion (negi).[1][2] The balls are brushed with takoyaki sauce (similar to Worcestershire sauce) and mayonnaise, and then sprinkled with green laver (aonori) and shavings of dried bonito (katsuobushi).
Yaki comes from yaku (焼く), which is one of the cooking methods in Japanese cuisine, meaning 'to grill'...' Source: Wikipedia
Despite it's simplistic look, it's actually quite a complete kit with a multitude of sub-component parts - like the microwave model that's shown above - so it will undoubtedly keep me occupied for some time. I'm taking video footage of my progress and will eventually produce a video showing the build. and because of this, I am also creating some graphics to go with the final video - which are turning out to be quite enjoyable fun as well! Here's one of the little doodles I have made to decorate the video...
Anyhoo, the point is... There's SO much to do with this project as I make one small kitchen item or appliance at a time and that's before I get onto the building itself. So this will keep bits and pieces on my workbench for a long time to come!Japanese Vending Machine Model
Obviously, this is kinda related to my interest to things Japanese and the above model project. I wanted to explore scratch building my own 1/12 model, a step up from making a commercial kit. The takoyaki restaurant build is giving me a valuable insight into how 1/12 scale objects can be put together, so I wanted to explore this with some items of my own.
I am starting very simply with a Japanese vending machine, which sounds pretty mundane but these vending machines are a pretty iconic pop cultural item and are quite intriguing to the westerner.
 |
| Above: I searched around for an image of a vending machine on which I could base a model on. |
...LOL But let's not get side-tracked by my rabbit hole which is my eclectic interests...
I am hoping that this simple project - which is essentially a 'box' with external decoration - will be a easy grounding in some of the new techniques I need to learn to make 1/12 'doll house' projects. First among these - at this stage - is how to make realistic looking graphic decals for my builds.
SO.. Decals. There is two ways to go about applying decals to model; transfers or stickers. And I am trying out the stickers approach first (I have never tried making either decal making methods before, so this is completely new to me, so kinda exciting)!
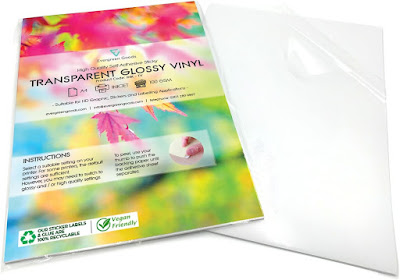
I purchased a pack of inkjet sticker making sheets to try out making my sticker decals...
Now, hopefully, I can print my own decals to apply to my models... In theory. But, not having done this I have yet to see if this will work. BUT, even before this, I must first design my graphics. For this I traced the graphics from the vending machine picture (above) using the vector program Affinity Designer...
Once I have drawn all the necessary graphic items from the vending machine then I can try printing out the scaled graphics on the sticker transfer sheets...
I chose a transparent sticker sheet so that this can be laid over coloured plastic to replicate the effect seen on the vending machine. The drawback, of course, is that I cannot print white on my inkject printer, so I would have to use white sheets for images that include areas of white... Er, if you see what I mean. Anyway, we will cross that bridge when we come to it. For now, all I need is a sticker with a transparent background... I hope...
Test number one. Lets see how this works out this week! 😉
And that's it for now...Quite a lot going on, if all at early stages of development.


Post a Comment